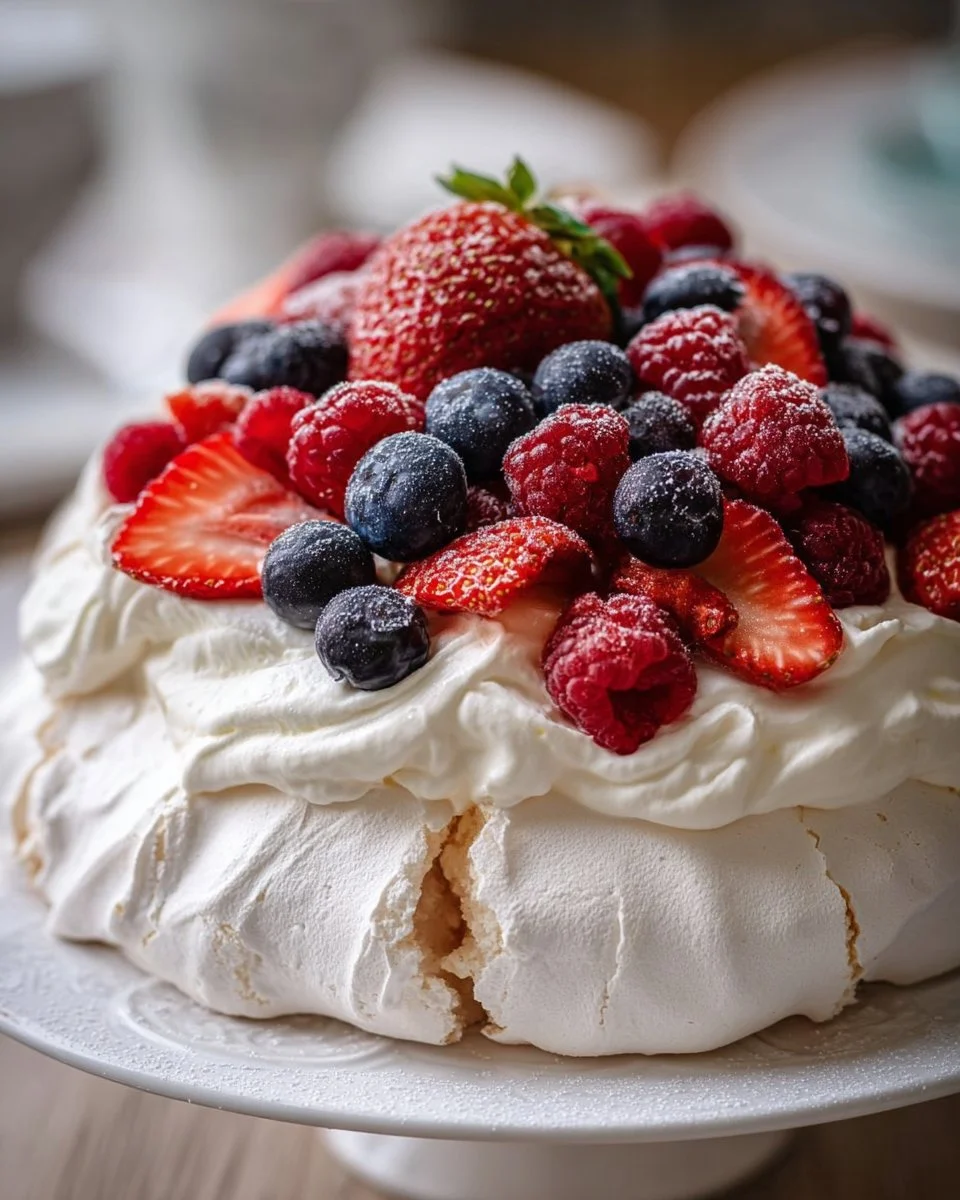
Imagine a warm spring afternoon, where the sun casts a gentle glow over a blooming garden. The air fills with a sweet, floral fragrance that dances around you, beckoning the flavors of fresh strawberries, lush raspberries, and tart blueberries. You walk toward the picnic table, where a pristine white cloud awaits your arrival—a gorgeous pavlova, glistening with whipped cream and adorned with a vibrant array of berries. As you catch a glimpse of this delicate dessert, your mouth waters in anticipation, knowing it embodies the love and joy of a special occasion.
With each slice, you uncover the enchanting layers within. The exterior, crisp and sugary, gives way to a marshmallowy interior that melts in your mouth. The cream on top is light and luscious, creating a perfect contrast and balance to the beautifully tart berries. Each bite is a symphony of textures—a delightful crunch softening into a pillowy embrace that transports you to a place of pure bliss. This pavlova is not just a dessert; it is a celebration of togetherness, a treat worthy of the extraordinary bond shared on Mother’s Day.
Why You’ll Love This Mother’s Day Pavlova
This Mother’s Day pavlova stands out not just for its stunning beauty but for its irresistible flavor and texture that captivates all who dare to indulge. You’ll find it’s versatile enough to grace your table for any occasion, whether it’s a spring picnic, a festive gathering, or simply a delightful end to a weeknight meal. Imagine the delight on your loved one’s face as they experience the ethereal lightness of this dessert, complemented by the vibrant flavors of seasonal berries.
The pavlova is inherently gluten-free, making it a friendly option for any diet. Its sweet, airy nature balances perfectly with the tartness of fresh fruit and the richness of whipped cream. Additionally, the preparation becomes a joyful experience, turning the kitchen into a haven filled with love and laughter. You will find that this dessert allows for creativity; you can easily adapt the toppings to include any fruit in season or even delight in a drizzle of chocolate sauce if your taste buds desire. Each bite offers a lightness that feels like a gentle hug, making it feel right at home on Mother’s Day.
Preparation Phase & Tools to Use
To craft this heavenly pavlova, having the right tools makes a world of difference:
- Mixing Bowl: Opt for a glass or metal bowl. Avoid plastic, as any leftover grease can hinder the egg whites from whipping up perfectly.
- Electric Mixer: A handheld or stand mixer will save time and ensure your egg whites reach the right texture without straining your arm.
- Rubber Spatula: Use this to gently fold in your cornstarch and vinegar, preserving the airiness you’ve just created in the meringue.
- Parchment Paper: This prevents the pavlova from sticking and ensures an easy transfer to your serving platter.
Preparation Tips:
- Ensure your mixing tools are completely clean and dry. Any moisture can sabotage the meringue!
- When separating the egg whites from the yolks, take care not to get any yolk in the whites, as this will prevent them from whipping properly.
Ingredients for Mother’s Day Pavlova
- 4 large egg whites: Fresh egg whites will create the most stable meringue. Feel free to experiment with aquafaba for a vegan version.
- 1 cup granulated sugar: This is the sweet magic that forms the crispy crust and fluffy inside. Consider experimenting with superfine sugar to achieve a smoother texture.
- 1 teaspoon cornstarch: This adds to the pavlova’s soft center, helping maintain that delightful chewiness.
- 1 teaspoon white vinegar: The acid stabilizes the egg whites and adds a subtle tanginess that cuts through the sweetness.
- 1 cup heavy cream: Whipped to perfection, it provides the creamy layer that complements the meringue beautifully.
- 2 tablespoons powdered sugar: This sweetener rounds out the whipped cream without compromising its lightness.
- 1 teaspoon vanilla extract: A dash of vanilla enhances the overall flavor, making every bite a lovely experience.
- Assorted fresh berries: Use strawberries, blueberries, and raspberries for a colorful and tasty topping. You can substitute with kiwi, peaches, or even a citrus medley.
How to Make Mother’s Day Pavlova
- Preheat your oven to 275°F (135°C) and line a large baking sheet with parchment paper. This sets the stage for even baking.
- In a clean mixing bowl, beat the egg whites on medium speed until soft peaks form, resembling fluffy clouds.
- Gradually add the granulated sugar, about a tablespoon at a time, continuing to whip until glossy, stiff peaks form—this should take about 10 minutes.
- Gently fold in the cornstarch and vinegar using a rubber spatula. This delicate step integrates the ingredients without deflating your meringue.
- Spread the mixture onto the prepared baking sheet, creating a slight well in the center. This ensures your pavlova stays fluffy, preventing it from collapsing.
- Bake for 1 hour, then turn off the oven and let the meringue cool completely inside. This slow cooling process keeps it crispy on the outside and soft within.
- In another bowl, whip the heavy cream with powdered sugar and vanilla extract until soft peaks form. This creates a heavenly topping for your pavlova.
- Once the meringue is cool, top it with whipped cream and scatter the assorted fresh berries generously on top. Admire the colors as you prepare to slice.
- Slice and serve, enjoying the delightful textures and flavors that come together in every mouthful. Don’t forget to share your creation with those you love!
Chef’s Notes & Helpful Tips
- Make-ahead tips: Prepare the meringue a day in advance and store it in an air-tight container once cooled. This allows for less stress on the day you want to serve it.
- Cooking alternatives: If you prefer using an air fryer, you can bake at the same temperature and monitor the time closely, halting when the meringue is golden.
- Customization ideas: Try to infuse flavors into your whipped cream with lemon zest or even a touch of almond extract, or elevate the berry medley with a drizzle of honey or balsamic syrup for an additional depth of flavor.
Common Mistakes to Avoid
- Not using room temperature egg whites: Cold egg whites don’t whip as successfully, leading to a less stable meringue.
- Overbeating the egg whites: If you whip them too much, they can become dry and lose their shine. Stop as soon as stiff peaks form.
- Rushing the cooling process: Letting your pavlova cool in the oven rather than pulling it out immediately keeps it from cracking and collapsing.
What to Serve With Mother’s Day Pavlova
- Fresh mint: Adds a refreshing note to each bite.
- Chocolate shavings: For an indulgent twist that harmonizes perfectly with the fruitiness.
- Coconut flakes: Sprinkle lightly for an exotic vibe that contrasts with the creamy texture.
- Caramel sauce: Drizzle over the top for an extra layer of sweetness.
- Citrus zest: Lemon or lime zest brightens up the dessert beautifully.
- Almonds or pistachios: A sprinkle adds a delightful crunch and a touch of nuttiness to elevate your pavlova.
Storage & Reheating Instructions
Store leftover pavlova uncovered at room temperature for up to one day if it remains intact. If you anticipate not finishing it, components should be kept separate; meringues can become chewy if topped with cream and berries too soon. However, the meringue itself can be frozen for up to a month—simply thaw at room temperature. Whipped cream can stay fresh in the fridge for about three days, and fresh berries should be consumed within 1-2 days.
Estimated Nutrition Information
- Calories: 240
- Fat: 15g
- Carbohydrates: 23g
- Protein: 4g
(These values are conditional based on portion size and specific ingredients used; always adjust based on personal servings.)
FAQs
1. Can I make pavlova in advance?
Absolutely! The meringue itself can be made a day ahead and stored in an airtight container. It’s recommended to add the whipped cream and fruit just before serving for the best texture.
2. What should I do if my pavlova cracks?
Cracking is perfectly normal! It won’t impact the deliciousness. Cool slowly, and consider using decorative toppings to hide any imperfections when serving.
3. Can I use frozen berries instead of fresh?
While frozen berries lack the same vibrant texture, you can still use them. Thaw and drain excess liquid before using them as toppings.
4. What happens if my meringue doesn’t reach stiff peaks?
If it doesn’t, the egg whites may not have whipped correctly. Make sure all equipment is oil-free, and consider starting over with new egg whites if they turned grainy or the texture seems off.
5. Can I reduce the sugar?
While reducing sugar changes the texture and sweetness, using a sugar substitute designed for baking can be a good alternative. Note that sugar plays a crucial role in the meringue’s structure.
Conclusion
As you prepare this Mother’s Day pavlova, you enter a world where simple ingredients transform into a centerpiece of joy. Your loved ones will savor not just the delightful flavors but the memories created in the kitchen. So, roll up your sleeves, embrace the loving essence of this special treat, and indulge in a slice of creamy, fruity perfection. It’s more than just a dessert; it’s an experience that speaks the language of love, laughter, and all the sweetest moments a Mother’s Day can bring. Enjoy every moment of crafting this delightful creation and watch as it becomes a cherished tradition in your home!
Print
Mother’s Day Pavlova
- Prep Time: 15 minutes
- Cook Time: 60 minutes
- Total Time: 75 minutes
- Yield: 8 servings 1x
- Category: Dessert
- Method: Baking
- Cuisine: New Zealand
- Diet: Gluten-Free
Description
A stunning and delicious pavlova topped with whipped cream and fresh berries, perfect for Mother’s Day celebrations.
Ingredients
- 4 large egg whites
- 1 cup granulated sugar
- 1 teaspoon cornstarch
- 1 teaspoon white vinegar
- 1 cup heavy cream
- 2 tablespoons powdered sugar
- 1 teaspoon vanilla extract
- Assorted fresh berries (strawberries, blueberries, raspberries)
Instructions
- Preheat your oven to 275°F (135°C) and line a large baking sheet with parchment paper.
- Beat the egg whites on medium speed until soft peaks form.
- Gradually add the granulated sugar, one tablespoon at a time, continuing to whip until glossy, stiff peaks form—about 10 minutes.
- Fold in the cornstarch and vinegar using a rubber spatula.
- Spread the mixture onto the prepared baking sheet, creating a slight well in the center.
- Bake for 1 hour, then turn off the oven and let the meringue cool completely inside.
- Whip the heavy cream with powdered sugar and vanilla extract until soft peaks form.
- Top the cooled meringue with whipped cream and scatter the fresh berries on top.
- Slice and serve, enjoying the delightful textures and flavors.
Notes
Feel free to customize the toppings with seasonal fruits or a drizzle of chocolate sauce.
Nutrition
- Serving Size: 1 slice
- Calories: 240
- Sugar: 16g
- Sodium: 15mg
- Fat: 15g
- Saturated Fat: 9g
- Unsaturated Fat: 6g
- Trans Fat: 0g
- Carbohydrates: 25g
- Fiber: 1g
- Protein: 4g
- Cholesterol: 0mg