
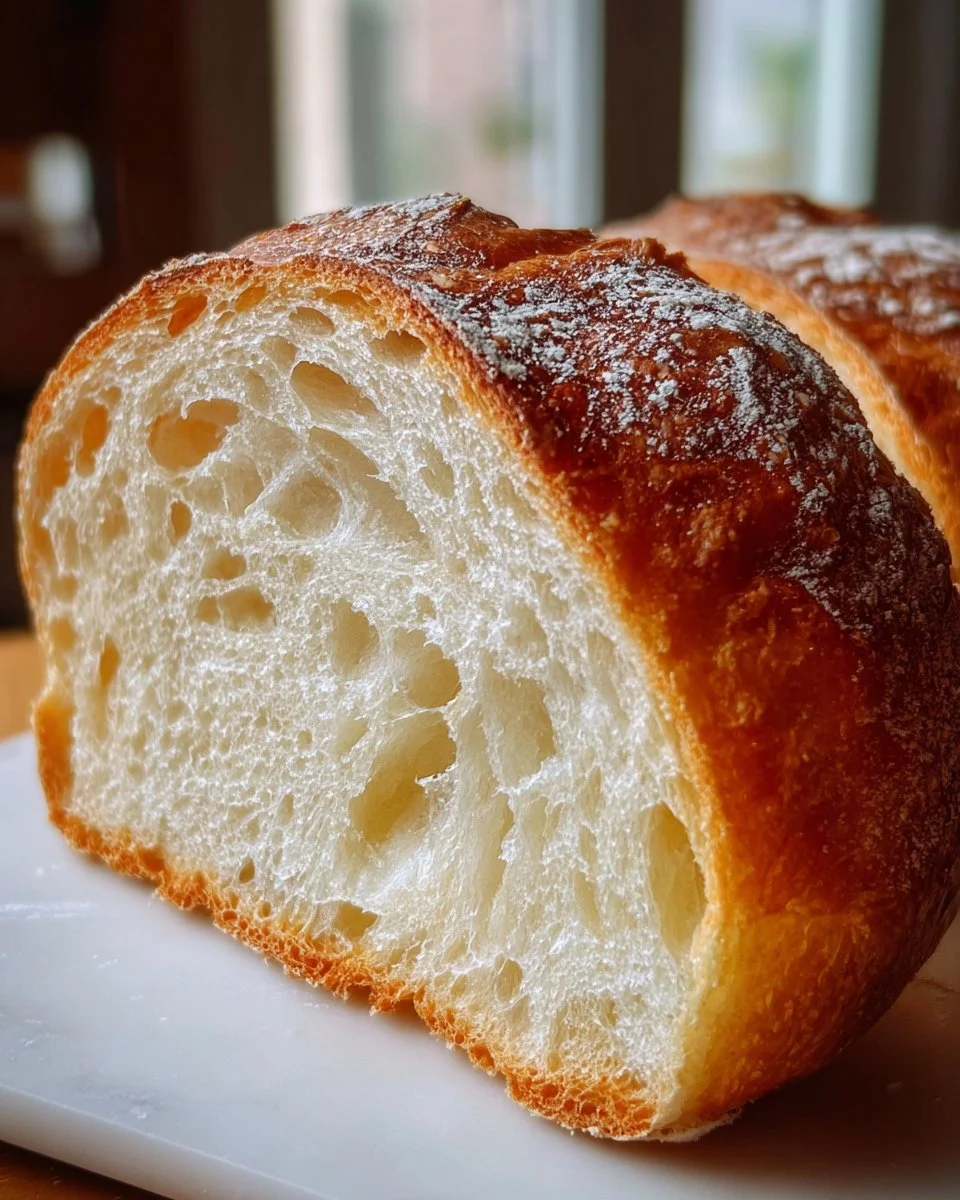
A moment of bliss arises the instant your nose catches a whiff of freshly baked sourdough sandwich bread. The aroma wafts through the kitchen, a welcoming embrace that invites all who enter to venture closer. Imagine the crust, a deep, warm golden hue, crackling gently when pressed, promising a symphony of textures within. As you slice through the loaf, the soft, pillowy interior reveals itself; its creaminess like a cloud and its slight tang hinting at the magical sourdough starter that brought it to life. Each slice is a promise of warmth, perfect for toasting, layering with your favorite spreads or simply enjoying as it is, with a hint of butter melting into its luscious crumb—the essence of comfort food, capturing the heart of every family meal.
There’s a unique satisfaction that comes with mastering the art of sourdough. The gentle fermentation process, nurtured over time, cultivates not only flavor but a deep connection to craftsmanship. Creating your very own soft sourdough sandwich bread transforms the mundane into the extraordinary. Whether you are preparing a hearty breakfast, crafting a delightful lunch for the family, or whipping up a midnight snack, every soft slice carries a story woven into its texture and taste. Each loaf becomes a canvas, adaptable to any whim and ideal for sharing, making every occasion special and memorable.
Why You’ll Love This Soft Sourdough Sandwich Bread
First and foremost, the flavor of soft sourdough sandwich bread stands unmatched. It brings together a delightful balance of sweetness from the sugar and the characteristic tang from the sourdough starter—a duet that dances on your taste buds. You experience a comforting softness that is perfect for sandwiches yet versatile enough to pair beautifully with soups, salads, and even savory dips.
Beyond taste, this bread offers health benefits too. The fermentation process involved in creating sourdough enhances the digestibility of the grains, making nutrients more accessible for your body. By cultivating your own starter, you embark on a journey towards homeliness and wholesome food. Plus, with the ability to customize the loaf—adding seeds, herbs, or even spices—you can create something that aligns with your palate and dietary preferences.
Moreover, nothing welcomes guests or family to the table quite like the sight of a freshly baked loaf of bread. It invites conversations and fosters connections, especially when slathered with creamy butter or layered with fine cheeses and deli meats. With every bite, you celebrate not only the flavors but also the moments spent gathering around good food.
Preparation Phase & Tools to Use
Successful baking requires the right tools, as each plays a crucial role in your bread-making adventure:
- Mixing Bowl: A large bowl offers ample space for combining all the ingredients while allowing the dough to rise.
- Wooden Spoon or Dough Scraper: These help incorporate ingredients effortlessly and avoid over-manipulating dough.
- Floured Surface: A clean, floured space ensures the dough doesn’t stick, making kneading a breeze.
- Plastic Wrap or Towel: This helps to cover your dough during rises, retaining warmth and moisture for an optimal environment.
- Loaf Pan: A standard loaf pan shapes your bread beautifully and helps achieve that desired soft, sandwich-ready texture.
- Thermometer (optional): A handy tool to check the water temperature; warm (not hot) water is crucial for activating the sourdough starter.
Preparation tips to keep in mind include measuring ingredients accurately, warming your water just enough to be pleasing to the touch, and ensuring your starter is bubbly and fresh for the best fermentation.
Ingredients for Soft Sourdough Sandwich Bread
- 3 cups all-purpose flour: This forms the backbone of your bread, lending it structure and a tender crumb. Whole wheat or bread flour can also be used for more texture and nutrients.
- 1 cup sourdough starter: Take care to feed your starter 6-12 hours before using it to ensure it’s active and bubbly. Any good sourdough starter will work, even if it’s down to 50% hydration.
- 1 cup warm water: It activates the yeast in the starter and helps in developing gluten for that soft, airy texture. Make sure it’s warm, around 100°F (38°C) — tempting but not burning!
- 2 tablespoons sugar: This not only sweetens the bread subtly but also boosts fermentation.
- 1 tablespoon salt: Salt enhances the taste and regulates yeast activity; it’s a key player in flavor enhancement.
- 2 tablespoons olive oil: This fat enriches the loaf, contributing to its moistness and softness.
How to Make Soft Sourdough Sandwich Bread
-
In a large mixing bowl, combine the sourdough starter, warm water, and sugar. Stir until the sugar completely dissolves, creating a nurturing environment for the yeast.
-
Gradually add in the flour and salt, followed by the olive oil. Use a wooden spoon to mix until a shaggy dough forms. This initial mixing brings the ingredients together beautifully. Let the mixture rest for 10 minutes—this process enhances gluten development.
-
On a lightly floured surface, knead the dough for about 10 minutes until it feels smooth and elastic. The dough should spring back gently when pressed—this indicates proper gluten formation, crucial for a fluffy texture.
-
Place the kneaded dough in a greased bowl, cover it with plastic wrap or a damp towel, and allow it to rise for 1-2 hours, or until it doubles in size. A warm, draft-free environment works wonders here.
-
Once risen, gently punch down the dough to release excess gas. Shape it into a loaf and place it in a greased loaf pan. Cover it again and let it rise for another 30-60 minutes until it appears puffy and expands above the rim of the pan.
-
Preheat your oven to 375°F (190°C) during the final rise.
-
Bake for 25-30 minutes until the loaf turns golden brown and sounds hollow when tapped on the bottom. Those final moments of anticipation will tempt your senses—enjoy every second.
-
Allow the bread to cool on a wire rack before slicing. This step is vital; slicing too soon can result in a gummy texture.
Chef’s Notes & Helpful Tips
- Make-ahead tips: You can prepare the dough in advance, let it undergo the first rise, punch it down, and refrigerate overnight. The next day, simply shape it and let it rise again before baking.
- Cooking alternatives: You can use an air fryer for smaller loaves; just keep an eye on the temperature and time to achieve a golden, crusty finish.
- Customization ideas: Add herbs like rosemary, or spices such as cinnamon, or even mix in seeds like sesame or poppy for added flavor and crunch.
Common Mistakes to Avoid
-
Neglecting the starter: Always use an active and bubbly starter. If it’s been dormant for a while, feed it and let it perk up before use.
-
Incorrect water temperature: Too hot can kill the yeast; too cold can stall fermentation. Aim for warmth, not heat!
-
Skipping the kneading: Failing to knead sufficiently results in dense bread. Dedicate those ten minutes to developing the dough thoroughly.
-
Rushing the rise: Be patient with your dough. Under-risen bread won’t have the lift you desire; you want it to double, not just look bigger.
-
Slicing too soon: As tempting as it is to taste your creation, allow it to cool so the interior sets properly.
What to Serve With Soft Sourdough Sandwich Bread
- Avocado Toast: Creamy avocado spread atop toasted slices adds healthy fats and freshness. Top with a sprinkle of sea salt and chili flakes for zing!
- Classic BLT: Layer crispy bacon, fresh lettuce, and juicy tomatoes between two slices for a heartwarming, flavorful sandwich.
- Grilled Cheese: Melty cheese oozes from two slices of toasted sourdough, offering an indulgent, nostalgic experience that you’ll fall in love with each time.
- Peanut Butter and Banana: This sweet, sticky filling offers a delicious breakfast or snack, elevating your sourdough experience.
- Egg Salad: Creamy and tangy, it pairs beautifully with the bread’s softness, making for a satisfying lunch any day of the week.
- Homemade Soup: Serve alongside a warming bowl of tomato basil soup or a hearty chicken noodle for a comforting meal.
- Caprese Sandwich: Layer fresh basil, mozzarella, and ripe tomatoes for a refreshing and elegant lunch that sings of summer.
- Charcuterie Board: Slice your loaf to complement an array of meats, cheeses, and olives for the perfect appetizer during gatherings.
Storage & Reheating Instructions
For optimal freshness, store your cooled bread wrapped in a cloth or housed in an airtight container at room temperature for up to three days. If you wish to extend its life, freeze slices individually wrapped in plastic wrap, then stored in a zip-top bag for up to three months. Reheat gently in the oven or toaster, bringing back its wonderful texture without losing its moisture.
Estimated Nutrition Information
Approximate values per slice (serving size: 1 slice):
- Calories: 150
- Carbohydrates: 27g
- Fat: 3g
- Protein: 4g
- Dietary Fiber: 1g
*Disclaimer: Nutritional values may vary based on specific ingredients and portion sizes.
FAQs
1. Can I use whole wheat flour instead of all-purpose?
Absolutely! Whole wheat flour adds a nutty flavor and extra fiber. Just keep in mind it may result in a denser loaf; you might want to mix it with all-purpose flour for a lighter texture.
2. How do I know if my sourdough starter is ready?
Your starter should double in size within 4-6 hours of feeding, be bubbly, and have a pleasant, slightly tangy aroma. If it sinks soon after rising, it may need more time or a more regular feeding schedule.
3. Can I make this recipe gluten-free?
You can, but you’ll need to use a gluten-free flour blend designed for yeast baking and include xanthan gum for texture. Keep in mind that results may differ from traditional bread.
4. What can I do if my bread doesn’t rise?
Several factors can cause this. Check that your starter is active and that the dough was kept in a warm space during rising. If it was too cool, it might hinder yeast activity.
5. How should I store leftover loaves?
Store leftovers in an airtight container at room temperature for up to three days. For long-term storage, slice and freeze the loaf. Reheat in the oven for best results!
Every loaf you bake tells a story, infused with love and memories waiting to be made. The joy of soft sourdough sandwich bread—its tender texture, delightful flavor, and the aroma it fills your home with—will surely become a cherished part of your culinary repertoire. So grab your ingredients, roll up your sleeves, and let the magic of homemade bread fill your heart and home. You won’t regret the delightful journey ahead, and believe me, every bite will be worth it.
Print
Soft Sourdough Sandwich Bread
- Prep Time: 15 minutes
- Cook Time: 30 minutes
- Total Time: 45 minutes
- Yield: 12 servings 1x
- Category: Breads
- Method: Baking
- Cuisine: American
- Diet: Vegetarian
Description
A deliciously soft sourdough sandwich bread, perfect for enjoying with a variety of spreads or as the foundation for hearty sandwiches.
Ingredients
- 3 cups all-purpose flour
- 1 cup sourdough starter
- 1 cup warm water (around 100°F/38°C)
- 2 tablespoons sugar
- 1 tablespoon salt
- 2 tablespoons olive oil
Instructions
- Combine the sourdough starter, warm water, and sugar in a large mixing bowl. Stir until dissolved.
- Add the flour and salt, followed by the olive oil. Mix until a shaggy dough forms. Let it rest for 10 minutes.
- Knead the dough on a lightly floured surface for about 10 minutes until smooth and elastic.
- Place the kneaded dough in a greased bowl, cover it, and let it rise for 1-2 hours until doubled in size.
- Punch down the dough to release gas, then shape it into a loaf and place it in a greased loaf pan. Cover and let it rise for another 30-60 minutes.
- Preheat your oven to 375°F (190°C) during the final rise.
- Bake for 25-30 minutes until golden brown and hollow sounding when tapped.
- Cool on a wire rack before slicing.
Notes
For make-ahead tips, prepare the dough in advance, let it rise, punch it down, and refrigerate overnight. Also, you can customize this bread by adding seeds, herbs, or spices.
Nutrition
- Serving Size: 1 slice
- Calories: 150
- Sugar: 2g
- Sodium: 400mg
- Fat: 3g
- Saturated Fat: 0.5g
- Unsaturated Fat: 2.5g
- Trans Fat: 0g
- Carbohydrates: 27g
- Fiber: 1g
- Protein: 4g
- Cholesterol: 0mg