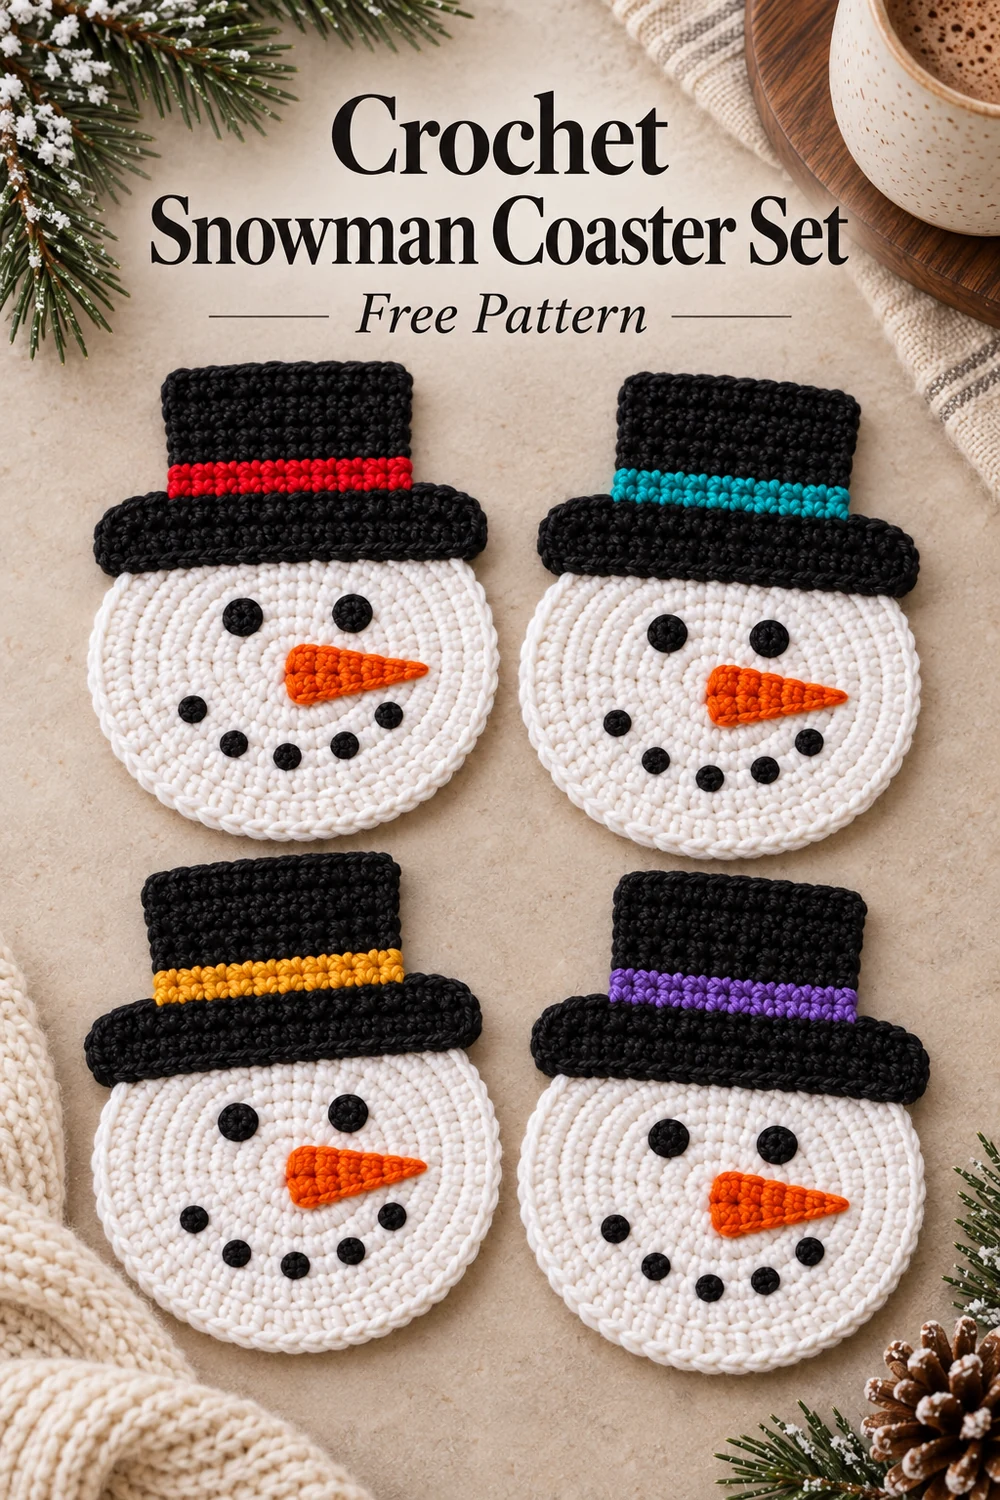
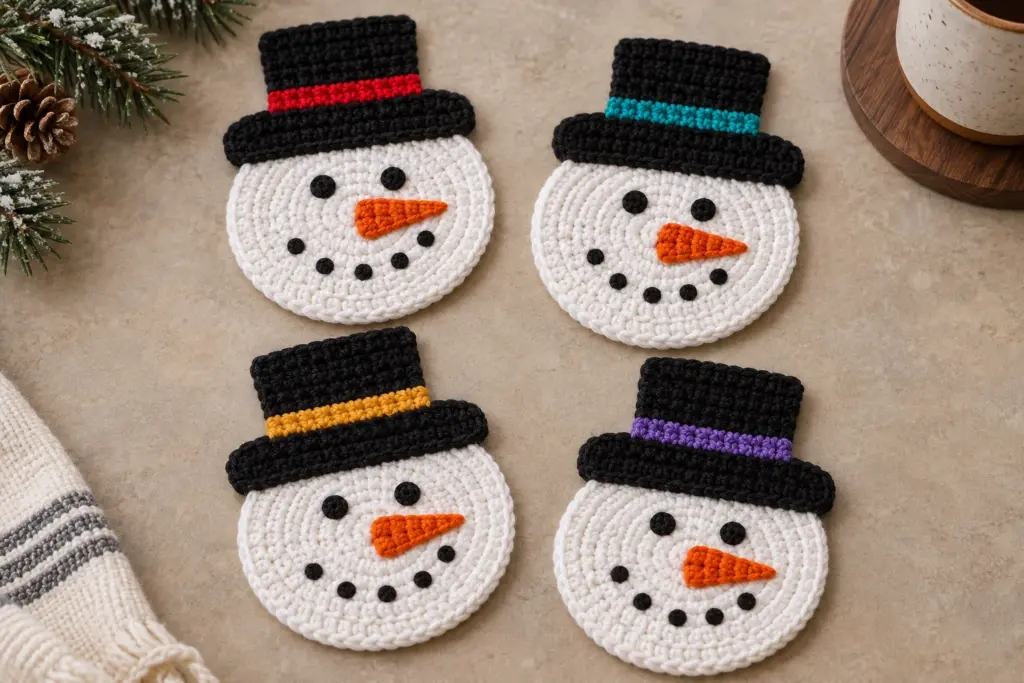
Crochet Snowman Coaster Set
Bring a cheerful handmade touch to winter drinks with this original Crochet Snowman Coaster Set. The free pattern makes four flat, washable snowman-face coasters, each finished with a black top hat and a different accent-colored hatband. Every visible feature is made from yarn—no buttons, beads, glue, stuffing, or other hardware are required.
Pattern at a Glance
- Skill level: Advanced beginner
- Terminology: US crochet terms
- Construction: Joined rounds, turned rows, sewn appliques, and embroidery
- Set size: Four coasters
- Primary yarn: Worsted-weight category 4 cotton
- Hook: US G/6 (4 mm), or size needed for gauge
- Finished base diameter: Approximately 5 in/12.5 cm
- Finished height with hat: Approximately 6 1/4 in/16 cm
Visible Component Inventory
Before beginning, note every visible element required for the complete set:
- 4 round snowman-face coaster bases
- 8 crocheted eye dots, 2 per coaster
- 4 crocheted carrot noses, 1 per coaster
- 4 top-hat crowns, 1 per coaster
- 4 top-hat brims, 1 per coaster
- 4 contrasting hatbands, 1 per coaster
- 4 embroidered five-dot smiles, 1 per coaster
The smile is a visible embroidered feature rather than a separate crocheted component.
Materials You’ll Need
- Worsted-weight category 4, machine-washable cotton yarn: white, approximately 100 yd/92 m
- Black cotton yarn, approximately 35 yd/32 m
- Orange cotton yarn, approximately 8 yd/7 m
- Red, teal, golden yellow, and violet cotton yarn, approximately 3 yd/2.7 m of each color
- US G/6 (4 mm) crochet hook, or size needed to obtain gauge
- Yarn needle
- Removable stitch marker
- Scissors
- Rustproof pins and blocking mat
No stuffing or hardware is used. Smooth, absorbent cotton is recommended so the finished coasters remain flat and washable.
Gauge
The first 4 rounds of the snowman coaster base should measure approximately 2 1/2 in/6.5 cm across after gentle blocking. Exact gauge is less important than making a firm, flat fabric, but all four coasters should match. Measure the first base before making the remaining three.
Finished Measurements
Each blocked circular base measures approximately 5 in/12.5 cm in diameter. Including the hat above the circle, each completed snowman measures approximately 6 1/4 in/16 cm tall and 5 in/12.5 cm wide.
Crochet Abbreviations
- beg = beginning
- ch = chain
- dc = double crochet
- fasten off = cut yarn and secure final loop
- inc = work 2 sc in the indicated stitch
- MR = magic ring
- rep = repeat
- rnd(s) = round(s)
- RS = right side
- sc = single crochet
- sl st = slip stitch
- st(s) = stitch(es)
- WS = wrong side
Important Pattern Notes
- Ch 1 at the beginning of a single crochet round or row does not count as a stitch.
- Join every base round with a sl st to the first sc. Do not turn the base.
- Turn after every applique row unless the instructions say to fasten off.
- Place a marker in the first stitch of a round if helpful.
- Numbers in parentheses are completed stitch counts.
- Make all components before beginning assembly.
- Leave each specified sewing tail when fastening off.
- Keep the hat and facial features clear of the outermost round so a cup can rest on the central surface.
Complete Free Crochet Pattern
Snowman Coaster Base — Make 4 in White
Rnd 1: Make an MR, ch 1, work 6 sc in ring; pull ring closed and join. (6)
Rnd 2: Ch 1, inc in each st around; join. (12)
Rnd 3: Ch 1, [sc in next st, inc in next st] 6 times; join. (18)
Rnd 4: Ch 1, [sc in next 2 sts, inc in next st] 6 times; join. (24)
Rnd 5: Ch 1, [sc in next 3 sts, inc in next st] 6 times; join. (30)
Rnd 6: Ch 1, [sc in next 4 sts, inc in next st] 6 times; join. (36)
Rnd 7: Ch 1, [sc in next 5 sts, inc in next st] 6 times; join. (42)
Rnd 8: Ch 1, [sc in next 6 sts, inc in next st] 6 times; join. (48)
Rnd 9: Ch 1, sc in each st around; join. (48)
Fasten off, leaving an 8 in/20 cm tail. Weave this tail securely through the WS; it is not used for assembly.
Eye Dot — Make 8 in Black
Rnd 1: Make an MR, ch 1, work 5 sc in ring; join. (5)
Fasten off, leaving a 10 in/25 cm sewing tail. Pull the center closed firmly. Each eye should remain a tiny flat circle.
Carrot Nose — Make 4 in Orange
Ch 3.
Row 1: Work 2 sc in second ch from hook, turn. (2)
Row 2: Ch 1, inc in first st, sc in next st, turn. (3)
Row 3: Ch 1, inc in first st, sc in next 2 sts. (4)
Fasten off, leaving a 12 in/30 cm sewing tail. The narrow Row 1 end is the nose tip, and the wider Row 3 edge is its base.
Top-Hat Crown — Make 4 in Black
Ch 12.
Row 1: Sc in second ch from hook and in each ch across, turn. (11)
Rows 2–5: Ch 1, sc in each st across, turn. (11)
After Row 5, fasten off, leaving a 14 in/36 cm sewing tail.
Top-Hat Brim — Make 4 in Black
Ch 18.
Row 1: Sc in second ch from hook and in each ch across, turn. (17)
Rows 2–3: Ch 1, sc in each st across, turn. (17)
After Row 3, fasten off, leaving a 14 in/36 cm sewing tail.
Hatband — Make 4
Make one hatband in each of these colors: red, teal, golden yellow, and violet.
Ch 12.
Row 1: Sc in second ch from hook and in each ch across. (11)
Fasten off, leaving a 12 in/30 cm sewing tail.
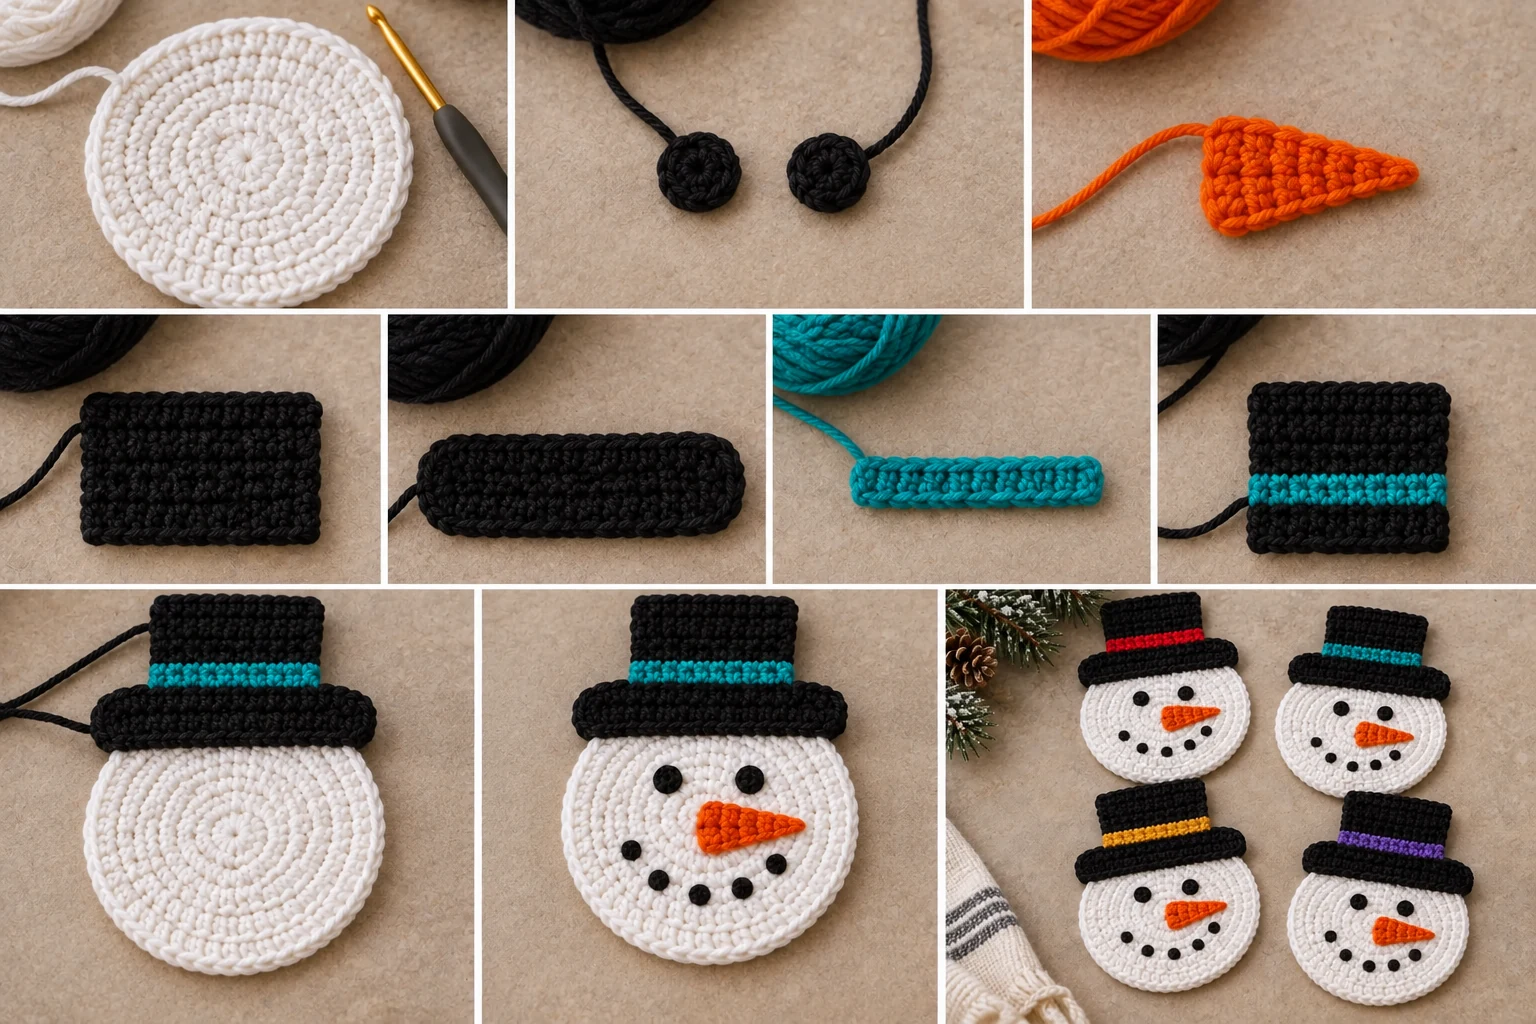
Assembly
Work with the RS facing. Use small whipstitches through the applique edge and the upper loops of the base fabric so the sewing does not distort the coaster.
- Block every base to a 5 in/12.5 cm circle and allow it to dry completely. Lightly block all rectangular hat pieces so their edges are straight.
- Pair one crown, one brim, and one differently colored hatband with each base. Center the hatband horizontally across the lower part of the crown, approximately 1/4 in/6 mm above the crown’s lower edge. With the hatband tail, sew along both long edges and secure both short ends. Knot only if needed, then weave the tail through the WS of the crown.
- Place the crown with its lower long edge overlapping the top of the white circle by approximately 1/2 in/1.3 cm. Center it horizontally. Using the crown tail, sew around all four edges, including the section over the base. Weave the tail securely into the WS.
- Center the brim horizontally over the crown’s lower edge. It should extend approximately 1/2 in/1.3 cm beyond each side of the crown and overlap the upper edge of the white circle. Using the brim tail, sew around all four edges, passing through the base wherever the pieces overlap. Weave in the tail.
- Place two eye dots below the brim. Center them approximately 3/4 in/1.9 cm apart, with their upper edges approximately 5/8 in/1.6 cm below the brim. Use each eye’s tail to sew around all five outer stitches. If necessary, pass once through the center opening to close it, then weave in securely on the WS.
- Center one carrot nose between and slightly below the eyes. Position its wide Row 3 edge approximately 3/4 in/1.9 cm below the eye centers, with the narrow tip angled toward the viewer’s right. Use the orange tail to sew around the entire triangle, easing it flat without stretching. Weave in securely.
- For the embroidered smile, thread a yarn needle with a doubled 18 in/46 cm strand of black yarn. Below the nose, embroider five separate small straight-stitch dots in a shallow upward-curving smile. Space the dots approximately 1/4 in/6 mm apart. Avoid long floats across the WS by securing and weaving the yarn between nearby dots. Repeat on all four coasters.
- Weave every remaining tail for at least 1 in/2.5 cm in three directions on the WS. Trim only after confirming that every applique is secure.
Stitch-Count Check
The base increases by six stitches per increase round: 6, 12, 18, 24, 30, 36, 42, and 48 stitches. Rnd 9 preserves the 48-stitch count. Each eye has 5 stitches. The nose rows contain 2, 3, and 4 stitches. Each crown row has 11 stitches, each brim row has 17 stitches, and each hatband has 11 stitches. Do not alter these counts when correcting tension or flatness.
Finishing
Gently wet-block each completed coaster. Pin the circular edge flat without stretching or distorting the hat, then allow the coaster to dry completely. Do not press the crochet with an iron. Before use, inspect all applique edges and yarn ends by hand and confirm that no loose loops remain.
Customization Ideas
Keep the construction, component quantities, and stitch counts unchanged while personalizing the palette. The four planned hatbands may use different shades of red, teal, golden yellow, and violet within those color families. You may also adjust the angle of each orange nose slightly or vary the shallow curve of the five-dot smile. Maintain the stated placements so the face remains balanced and the central area stays practical for a cup.
Common Mistakes to Avoid
- Counting the beginning ch 1 as a stitch, which produces an incorrect round or row count.
- Turning the circular base between rounds instead of continuing with the same side facing.
- Skipping a join or accidentally crocheting into the joining sl st.
- Stretching small appliques while sewing, causing the base to pucker.
- Placing features too close to the outer edge, leaving an uneven surface for a cup.
- Carrying long embroidery floats across the WS, where they can snag.
- Trimming sewing tails before checking that every edge is secure.
Troubleshooting
Why is my coaster ruffling?
Check every round count first and confirm that the joining sl st and beginning ch 1 were not treated as stitches. If the counts are correct, your stitches may be too loose. Try a smaller hook on the next base and gently block the completed piece without changing any stitch count.
Why is the base cupping?
Verify all increases and counts. If they are correct, your tension may be too tight. Try a slightly larger hook and compare the first four rounds with the stated gauge.
Why does the face look crowded?
Recheck the placement measurements before sewing. Keep the eyes below the brim, position the nose between and slightly below them, and reserve enough open space for the five-dot smile.
Why are the hat pieces curling?
Lightly wet-block the crown and brim into straight rectangles before assembly. Pin without stretching and let them dry completely.
Why is the finished coaster uneven?
Check that the appliques were eased into place rather than stretched. Confirm that the hat overlaps and facial placements match the assembly measurements, then wet-block the finished coaster flat.
Care Instructions
Wash according to the care directions on the cotton yarn label. Reshape the coaster while damp and dry it flat. Avoid high heat, harsh pressing, and hanging while wet, since these can distort the round base and layered hat.
Frequently Asked Questions
Is this pattern written in US terms?
Yes. All crochet terminology and abbreviations use standard US terms.
Do I need stuffing, safety eyes, buttons, or glue?
No. The design uses no stuffing or hardware. The eyes, nose, crown, brim, and hatband are crocheted, and the smile is embroidered with yarn.
Can I work the base in a continuous spiral?
No. Follow the written construction and join every base round with a sl st to the first sc. Do not turn between rounds.
Can I use acrylic yarn?
The pattern is designed for smooth, machine-washable worsted-weight cotton because it is absorbent and blocks well. A substitution may change the size, flatness, absorbency, and heat response, so make and measure one complete base before committing to the set.
How do I keep all four coasters the same size?
Use the same yarn, hook, tension, and blocking measurements throughout. Measure the first four rounds and the finished diameter of the first base before making the others.
Can I change the stitch counts to make a base lie flat?
No. First verify the written counts, then address minor flatness issues through hook choice, consistent tension, and gentle blocking. The specified stitch counts should remain unchanged.
Is the pattern physically tested?
No physical testing is claimed. Check gauge, flatness, feature placement, and the security of every sewn edge as you work.